Thanks for choosing the ReadiCheck AED inspection system from Readiness Systems. This Guide describes how to set up and use ReadiCheck. If you need help along the way, please email us at [email protected].
Log into AED Readiness Manager (Manager) using the account credentials you received from your AED program administrator, distributor or Readiness Systems. Email [email protected] if you don’t have your login credentials.
Before you can begin inspecting AEDs, you must set up Locations, Inspected AEDs and Users in Manager. Setup steps are highlighted below. For more detailed instructions, see the complete AED Readiness Manager User Guide.
Add/Manage Locations
After you log in to Manager, click the Locations tab on the main menu bar and confirm the Locations (Location Groups, Sites and Buildings) where you have inspected AEDs are listed. If not, add Locations using the Add Location Group, Add Site and Add Building buttons (all three layers are required). Inspected AEDs are linked to Locations during the add inspected AED step.
Location Group: A general grouping of sites. Location groups can be defined as needed. For example, geographic region, state, city, school district, business or educational campus, division, business unit, and so on.
Site: An area within a Location Group with one or more buildings where you have AEDs.
Building: A building where you have AEDs.
Note: Specific placement locations, e.g., office, cafeteria, etc., are added on the Add Inspected AED screen.
Add/Manage Inspected AEDs
Under the AEDs tab dropdown, click Inspected AEDs and confirm AEDs to be inspected are listed. If not, click the Add Inspected AED button and complete the Add Inspected AED form for each AED.
Note: AEDs will not appear in the ReadiCheck mobile AED inspection app until they are first added in Manager.
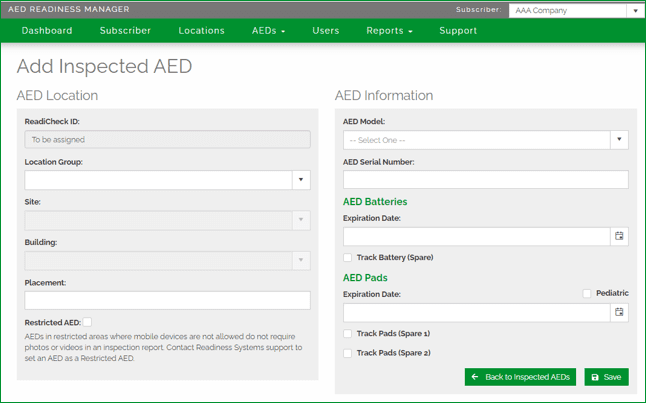
Add New Inspected AED
On the Add Inspected AED page, you will:
Link the AED to the Location Groups, Site and Building you set up on the Locations page
Describe this AED’s placement location, e.g., office, cafeteria, warehouse, etc.
The ReadiCheck ID field will be added automatically when you assign it to this AED by scanning a ReadiCheck ID sticker (QR code). More on this below.
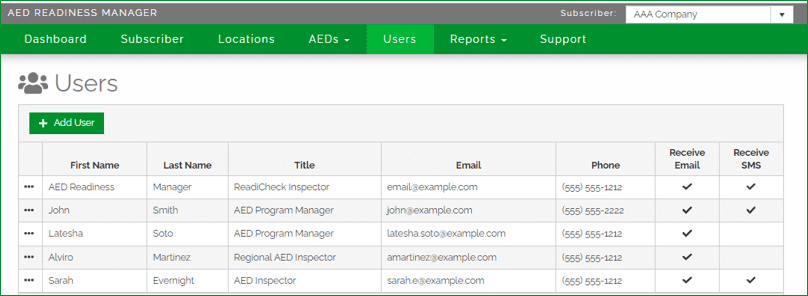
Add/Manage Users
Click on the Users tab and confirm each administrator and AED inspector is a registered User. If not, click the Add User button and complete the Add User form for each User.
NOTE: Only Users added in Manager can use the ReadiCheck mobile app to inspect AEDs.
Add New User
On the Add User page, you will:
Add first name, last name, title, email address, password (this can be changed by the user later if needed), and mobile phone number (to enable text messaging)
Select the User’s time zone
Assign top level or site level permissions to the user
Select which message types the User will receive
REMEMBER: Only Users added in Manager can use the ReadiCheck mobile app to inspect AEDs.
Install and login to the ReadiCheck mobile AED inspection app available via these links from Google Play for Anroid or the App Store for iPhone.
Then, follow the instructions below.
REMEMBER: ONLY USERS ADDED IN THE ONLINE AED READINESS MANAGER SOFTWARE CAN USE THE READICHECK INSPECTION APP. CONTACT YOUR AED PROGRAM MANAGER, DISTRIBUTOR, OR READINESS SYSTEMS IF YOU DON’T YET HAVE A USER ACCOUNT.
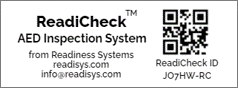
Register ReadiCheck IDs
Get ReadiCheck ID stickers:A ReadiCheck ID must be assigned to every AED before it can be inspected. ReadiCheck ID stickers containing unique QR codes are provided by Readiness Systems as part of ReadiCheck ordering process. Email [email protected] if you don’t have ReadiCheck ID stickers.
Apply ReadiCheck ID sticker: Place any ReadiCheck ID sticker on the AED cabinet, AED case or on a surface near where the AED is stored. NOTE: To inspect an AED, the unique QR code found on each ReadiCheck ID sticker must be registered to a specific AED using the ReadiCheck AED inspection app.
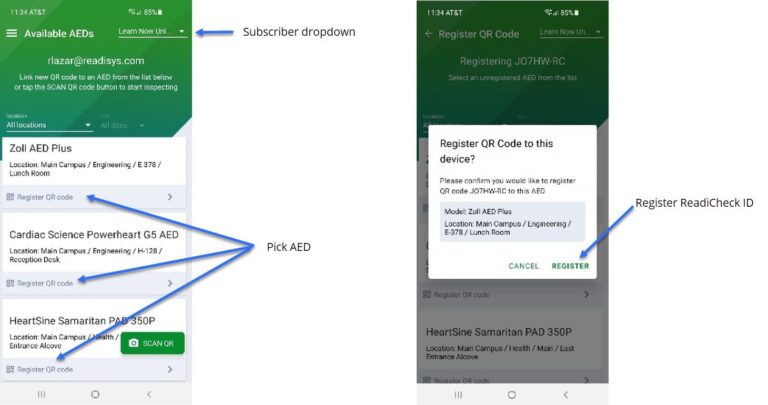
Pick Subscriber if Needed: If you inspect AEDs for more than one Subscriber, you will first need to select the applicable Subscriber from the dropdown. This will display a list of AEDs for this Subscriber that have not yet been assigned a ReadiCheck ID. If you inspect AEDs only for your organization, the dropdown will not appear, and you can skip this step.
Select AED: AEDs that have not yet been assigned a ReadiCheck ID appear on the list. AEDs with assigned ReadiCheck IDs are no longer listed. From the list, click “Register QR code” under the AED you are inspecting based on its location.
Assign ReadiCheck ID: Scan the ReadiCheck ID sticker you just placed.
Register ReadiCheck ID: On the popup box that appears, confirm you want to register this ReadiCheck ID QR code to this AED by clicking “REGISTER” – the Inspection Report form will then open.
Inspect AEDs with ReadiCheck
Pick Subscriber: Select the applicable Subscriber from the dropdown (this applies only If you inspect AEDs for more than one Subscriber).
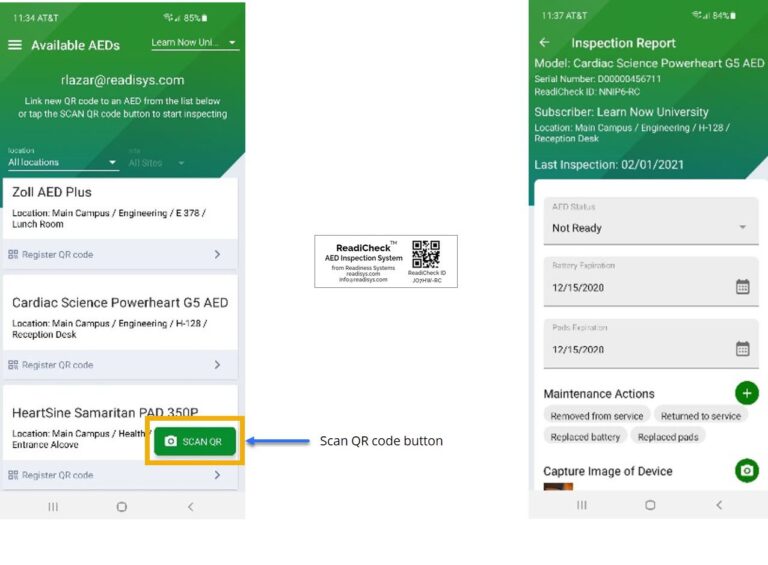
Scan QR code: Click SCAN QR and scan the ReadiCheck ID QR code assigned to this AED. The Inspection Report form for this AED will open automatically. Note: AEDs with assigned QR codes do not appear on a list. QR code scanning opens the Inspection Report for these AEDs.
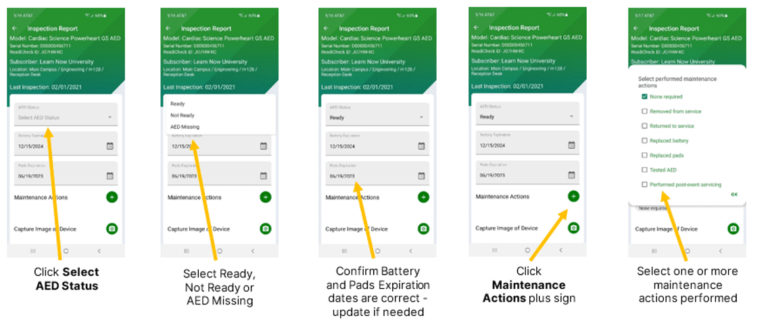
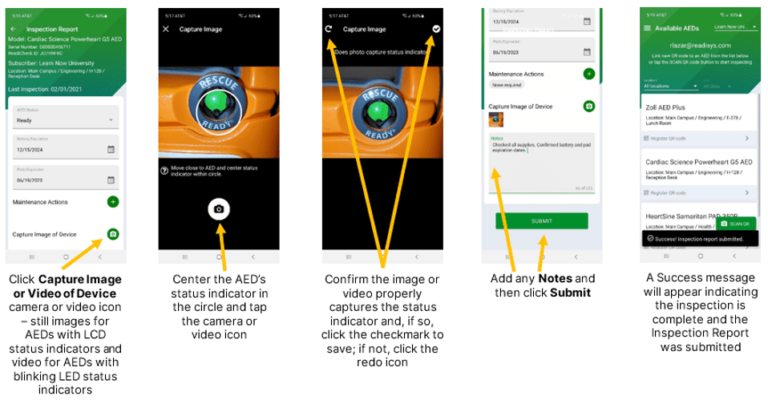
Inspect: Complete and Submit the Inspection Report as shown below.
Please provide the following information to report an AED use. This report should only be submitted by Readiness Systems customers or partners that subscribe to our medical direction and use reporting services.
Please submit this form. We will contact you if we have questions or need further information.