You can have as many location groups, sites, and buildings as you need. However, each site must be associated with an existing location group, and each building must be associated with an existing site. Create the highest-level location type you need first, then the lower-level location types afterward.
To add a location group:
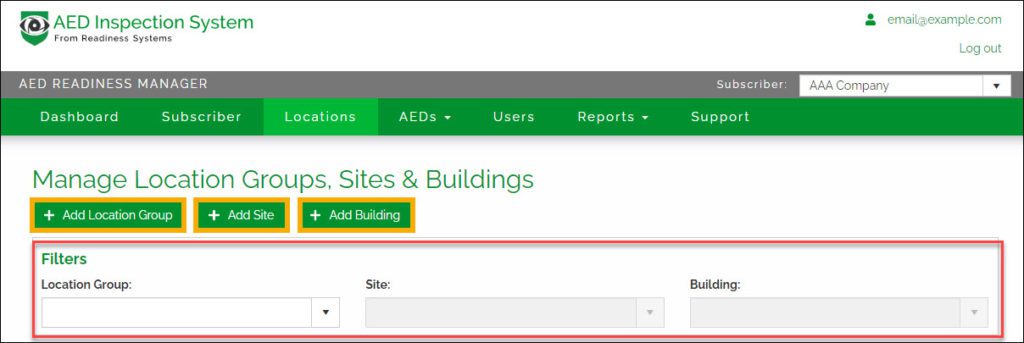
- Select Locations on the main menu bar.
The Manage Location Groups, Sites & Buildings screen appears.
- Select Add Location Group.
The Add Location Group pop-up window appears. – 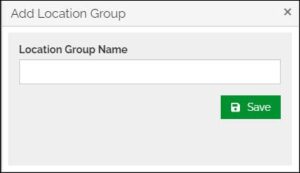
- In the Location Group Name field, enter a unique name for your location group. For example, “California,” “Chicago,” or “Region 1.”
- Select Save.
The location group is added to the list of your locations.
To add a site:
- Select Add Site.
The Add Site pop-up window appears. – 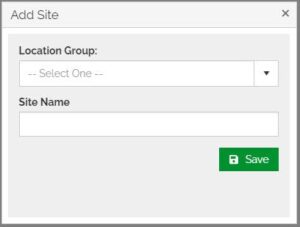
- From the Location Group dropdown menu, select the location group with which you want to associate your site.
- In the Site Name field, enter a unique name for your site. For example, “Main Campus” or “Goose Island.”
- Select Save.
The site is added to the list of your locations.
To add a building:
- Select Add Building.
The Add Building pop-up window appears. – 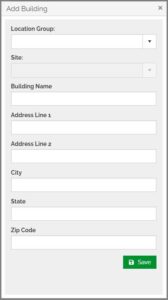
- Select the Location Group and Site to which you want to associate your building.
- In the Building Name field, enter a unique name for your building. For example, “Capitol Building” or “Operations Center.”
- Enter the building’s address information in the remaining fields.
- Select Save.
Your locations are saved and display on the Locations screen.
To begin monitoring an AED, first add it to Manager so you can see and use its information.
You will need the Sentinel ID for each monitoring camera. The Sentinel ID can be found on the box containing your monitoring camera and on label found on the button-side of the monitoring camera.
You must add a monitored AED to Manager before you install the monitoring camera in an AED cabinet or portable monitoring case.
To add a monitored AED:
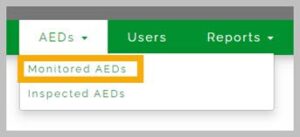
- Select Monitored AEDs on the main menu bar.
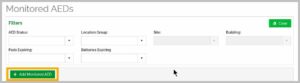
- Select Add Monitored AED.
The Add Monitored AED screen appears.
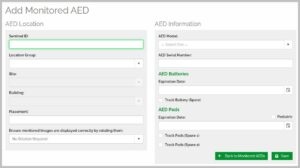
- In the AED Location section, enter the Sentinel ID associated with the AED Sentinel monitoring camera you want to add.
- Select the Location Group, Site, and Building where the AED will be located.
If the correct location doesn’t appear in the dropdown menus, add it to your locations.
- In the Placement field, enter a description of the specific place in the building the AED is located. For example, “First Floor Break Room.” For portable AEDs, enter an identifiable location, e.g., “Truck 123” or law enforcement vehicle “One Adam 12.”
- At the bottom of the section, select the appropriate image rotation if the monitoring camera is installed in other than the “up” position. This can be changed later, if needed.
- In the AED Information section, select the AED Model from the dropdown menu.
- Enter the AED Serial Number.
- Enter the AED Battery Expiration Date. Tick the box to track a spare battery if needed.
- Enter the AED Pads Expiration Date. Tick the box(es) to track one or two spare pads if needed. Be sure to tick the Pediatric box for pediatric pads if applicable.
- Select Save.
The monitored AED is saved and displays in your list of monitored AEDs. Install the AED Sentinel monitoring camera at the location you specified. When the installation is complete, the AED Sentinel monitoring camera will send information to this monitored AED record.
To begin inspecting an AED, first add it to Manager so you can see and use its information.
You will need to assign a ReadiCheck ID to each inspected AED. The ReadiCheck ID can be found on the QR code sticker sent to you by Readiness Systems.
You must add an inspected AED to Manager before you can use the ReadiCheck app to inspect an inpsected AED.
To add a monitored AED:
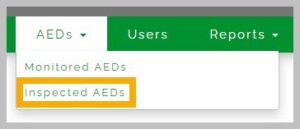
- Select Inspected AEDs on the main menu bar.
- Select Add Inspected AED.
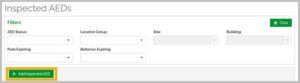
The Add Inspected AED screen appears.
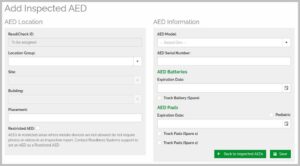
- In the AED Location section, note the ReadiCheck ID field is grayed out. The ReadiCheck ID will be assigned when this AED is first inspected with the ReadiCheck app. See ReadiCheck User Guide for instructions.
- Select the Location Group, Site, and Building where the AED will be located.
If the correct location doesn’t appear in the dropdown menus, add it to your locations.
- In the Placement field, enter a description of the specific place in the building the AED is located. For example, “First Floor Break Room.” For portable AEDs, enter an identifiable location, e.g., “Truck 123” or law enforcement vehicle “One Adam 12.”
- In the AED Information section, select the AED Model from the dropdown menu.
- Enter the AED Serial Number.
- Enter the AED Battery Expiration Date. Tick the box to track a spare battery if needed.
- Enter the AED Pads Expiration Date. Tick the box(es) to track one or two spare pads if needed. Be sure to tick the Pediatric box for pediatric pads if applicable.
- Select Save.
The inspected AED is saved and displays in your list of inspected AEDs. When you complete AED inspections using the ReadiCheck mobile inspection app, the app will send information to this inspected AED record.
If a monitored or inspected AED’s location changes, or after you replace AED batteries or pads, here is how to update the AED’s information.
- Select Monitored AEDs or Inspected AEDs on the main menu bar.
- Select
 (options menu) next to the AED you want to edit.
The AED options menu appears.
- Select Edit.
The Edit Monitored AED screen appears.
- Update the fields as needed.
- Select Save.
- After you save, select Back to AEDs.
Your changes are saved and display in your list of monitored and inspected AEDs.
If you want to see the details for a monitored or inspected AED but don’t need to update it, you can view it. This includes seeing the last 50 images – with timestamps – captured for the selected AED.
- Select Monitored AEDs or Inspected AEDs on the main menu bar.
- Select (options menu) next to the AED you want to view.
The AED options menu appears.
- Select View.
The View Monitored or Inspected AEDs screen appears.
- To see the image history, select View last 50 images from this device.
- When you’re done, select Monitored AEDs on the main menu bar.
- Select Monitored AEDs or Inspected AEDs on the main menu bar.
- Select (options menu) next to the AED you want to delete.
The AED options menu appears.
- Select Delete.
A browser pop-up window appears.
- Select OK to confirm that you want to delete the selected AED.
The selected AED is removed from the system.
Only Subscriber Admins can add new users to Manager. To add a new User to Manager:
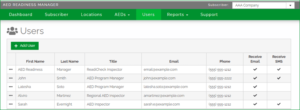
- Select Users on the main menu bar.
The Users screen appears.
- Select Add User.
The Add User screen appears.
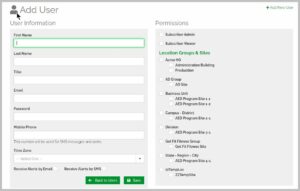
- Complete the User Information form, including selecting the user’s time zone.
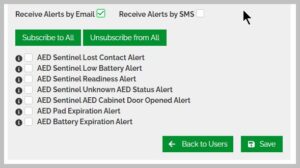
- At the bottom of the section, check the appropriate boxes to send alerts to this user by email, text (SMS), or both.
Grant Permissions
- In the Permissions section, select the appropriate permissions for this user.
- If the user needs subscriber-level permissions, mark the appropriate checkbox.
- If the user needs location-level permissions, mark the checkboxes next to the location groups or sites where the user needs permission. Using the radio buttons next to each location group or site, choose whether the user has Admin or Viewer permissions for that location.
- Select Save.
Select Message Types for User: A user’s record must first be saved and at least one monitored or inspected AED added before message types will appear and can be assigned to a user.
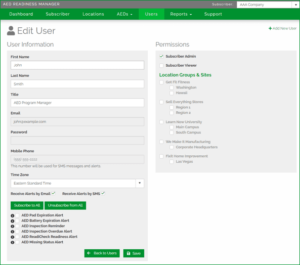
- Select the (options menu) next to the user’s name and select Edit to add message types assigned to this user.
On the Edit User screen, tick the boxes next to the message types assigned to the user. The list of message types depends on whether you have only AED Sentinel monitored AEDs, ReadiCheck inspected AED, or both. Select Save.
The user is added to the system. They can now sign into Manager or the ReadiCheck mobile inspection app with the credentials you created. Send this information to the user and have them change their password as needed to meet your organization’s security guidelines.
After you have saved, select the appropriate button to do any of the following:
- Add another user
- Continue editing the user you were just working with (Continue editing this user)
- Return to the list of all users (Back to Users)
- Select Users on the main menu bar.
The Users screen appears.
- Select (options menu) next to the user you want to edit.
The user options menu appears.
- Select Edit.
The Edit User screen appears.
- In the User Information section, update the fields as needed.
- In the Permissions section, select the appropriate permissions for this user.
- If the user needs subscriber-level permissions, mark the appropriate checkbox.
- If the user needs location-level permissions, mark the checkboxes next to the location groups or sites where the user needs permission. Using the radio buttons next to each location group or site, choose whether the user has Admin or Viewer permissions for that location.
- Select Save.
Your changes are saved. If you changed a user’s permissions, they will see the update the next time they sign in.
- Select Users on the main menu bar.
The Users screen appears.
- Select (options menu) next to the user you want to delete.
The user options menu appears.
- Select Delete.
A browser pop-up window appears.
- Select OK to confirm that you want to delete the selected user.
The user is removed from Manager.
The Dashboard displays the statuses of your monitored and inspected AEDs, their pads, and their batteries. It also displays basic information about your account, such as the number of AEDs and locations you have and, for ReadiCheck, your default AED inspection frequency.
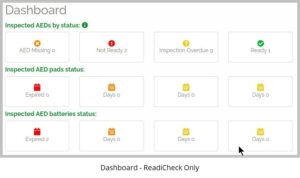
The appearance of the dashboard varies depending on whether you have only AED Sentinel monitored AEDs, ReadiCheck inspected AED, or both.
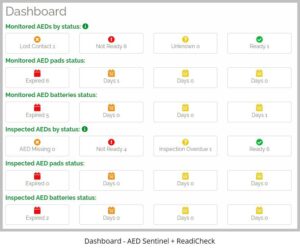
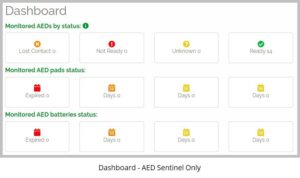
The Monitored AEDs by Status section displays the status of every AED you are currently monitoring, as indicated by the status indicator on each AED.
There are four possible statuses: Ready, Unknown, Not Ready and Lost Contact.
 Ready: The monitored AED is ready for use based on its status indicator and having battery and pads expiration dates within useful life.
 Unknown: AED Sentinel is unable to determine the monitored AED’s status based on its status indicator.
 Not Ready: The AED may not be ready for use based on its status indicator, or because of expired batteries or pads.
 Lost Contact: Data has not been received from an AED Sentinel monitoring camera for at least one messaging cycle.
Select a status tile to go to the Monitored AEDs screen and see a filtered list of all AEDs in the selected status.
The Inspected AEDs by Status section displays every AED you have set up in Manager including its status once you begin inspecting using the ReadiCheck smartphone-based inspection app.
There are four possible statuses: Ready, Inspection Overdue, Not Ready and AED Missing.
- Ready: The inspected AED is ready for use based on a human inspection.
- Inspection Overdue: The status of an inspected AED is not known because it was not inspected on schedule.
- Not Ready: The AED may not be ready for use based on a human inspection, or because of expired batteries or pads.
- AED Missing: An AED is reported missing by an AED inspector using the ReadiCheck app.
Select a status tile to go to the Inspected AEDs screen and see a filtered list of all AEDs in the selected status.
n addition to tracking the status of your monitored and inspected AEDs, AED Readiness Manager also tracks the expiration date of each AED’s pads and batteries. This lets you prepare to replace them before they expire.
Since the pads and batteries can expire at different times, each has its own section: AED Pads Status for the pads, and AED Battery Status for the batteries.
In each section are four date ranges:
 90 Days: Displays the number of AEDs with 90 days or fewer before the pads or batteries expire. This includes all the AEDs in the 60-day, 30-day, and Expired categories.
 60 Days: Displays the number of AEDs with 60 days or fewer before the pads or batteries expire. This includes all the AEDs in the 30-day and Expired categories.
 30 Days: Displays the number of AEDs with 30 days or fewer before the pads or batteries expire. This includes all the AEDs in the Expired category.
 Expired: Displays the number of monitored AEDs with pads or batteries that have expired. Expired pads or batteries automatically trigger a Not Ready AED status.
Select a pad or battery date range to go to the Monitored AEDs or Inspected AEDs screen and see a list of all AEDs in that range.
Select Monitored AEDs from the main menu bar. The Monitored AEDs screen displays status information for all AEDs you are monitoring with AED Sentinel. You can also use this screen to add and manage your monitored AEDs. By default, the screen automatically sorts AEDs alphabetically by location group. Use the fields shown below to learn about your monitored AEDs.

- Options menu button: Select the to see the menu options for this monitored AED. From this menu, you can edit, view, or delete a monitored AED. You can also see the AED’s monitoring history.
- Image Date and time: Displays the date and time of the last image received from the AED Sentinel monitoring camera.
- Last image: Displays the last AED status indicator image received from AED Sentinel monitoring camera.
- AED Status: Displays the status of your monitored AED.
- AED Make and Model: Displays the make and model of the AED being monitored by AED Sentinel.
- Battery and pads expiration dates: Displays the expiration dates of the monitored AED’s battery and pads along with color-coded status icons. If the battery or pads will expire in 90 days or less, the calendar icon indicates the number of days before it expires.
- Location information: Displays the location group, site, building, and placement of the monitored AED.
- Sentinel ID: Displays the unique Sentinel ID associated with the AED Sentinel monitoring camera assigned to this monitored AED.
- Sentinel battery status: Displays an icon to indicate the strength of the AED Sentinel hardware unit’s battery.
 Good: The AED Sentinel hardware unit’s batteries are at high strength.
 Low: The AED Sentinel hardware unit’s batteries are at medium or low strength and will need to be changed soon.
 Critical: The AED Sentinel hardware unit’s batteries are critically low and must be changed immediately.
- Sentinel cell strength: Displays an icon to indicate the strength of an AED Sentinel hardware unit’s connection to the cellular network.
 Strong: The AED Sentinel hardware unit has a strong connection to the cellular network.
 Fair: The AED Sentinel hardware unit has a fair connection to the cellular network.
 Poor: The AED Sentinel hardware unit has a poor connection to the cellular network.
Select Inspected AEDs from the main menu bar. The Inspected AEDs screen displays status information for all AEDs you are inspecting with ReadiCheck. You can also use this screen to add and manage your inspected AEDs. The screen automatically sorts AEDs alphabetically by location group. Use the fields shown below to learn about your inspected AEDs.
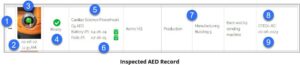
- Options menu button: Select the to see the menu options for this inspected AED. From this menu, you can edit, view, or delete an inspected AED. You can also view the AED’s inspection history.
- Image Date and time: Displays the date and time of the last image or video received from the ReadiCheck inspection app.
- Last image: Displays the last AED status indicator image or video received from the ReadiCheck inspection app.
- AED Status: Displays the status of your inspected AED.
- AED Make and Model: Displays the make and model of the AED being inspected by ReadiCheck.
- Battery and pads expiration dates: Displays the expiration dates of the inspected AED’s battery and pads along with color-coded status icons. If the battery or pads will expire in 90 days or less, the calendar icon indicates the number of days before it expires.
- Location information: Displays the location group, site, building, and placement of the inspected AED.
- ReadiCheck ID: Displays the unique ReadiCheck ID associated with the QR code assigned to this inspected AED.
- Next Inspection Date: Displays the next inspection date for this inspected AED. If the AED status is Inspection Overdue, the next inspection date will be in the past.
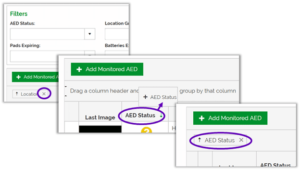
There are several filters available at the top of the Monitored AEDs and Inspected AEDs screens. Use these filters to see only AEDs of a specific status, location, or pad or battery status.

By default, AEDs are sorted by Location Group. You can re-sort this view by dragging a column header and dropping into the section just above all the column headers. By dragging multiple column headers into this section, you can create a custom sorting hierarchy beyond just Location Group. You can remove any or all of these sort selections by clicking on the X icon on the sort tile.
You can also re-sort a view by clicking on any column header.
You can create Asset Reports and Messaging and Alerts Reports for both Monitored AEDs and Inspected AEDs. In all cases, the reports are exported in .XLSX format.

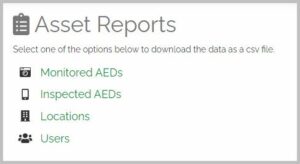
On the Asset Reports screen, you can create the following reports:
- Monitored AEDs: This report displays the information for all your monitored AEDs.
- Inspected AEDs: This report displays the information for all your inspected AEDs.
- Locations: This report displays information about all your locations, including the users assigned to them.
- Users: This report displays information about all your users.
Select the report you want to run. It downloads to your computer’s Downloads folder.
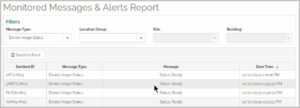
On the Monitored Messages & Alerts Report screen, you can view and export a monitoring history for your entire AED fleet. To view and export the monitoring history for a single AED, view the AED’s details on the Monitored AEDs page.
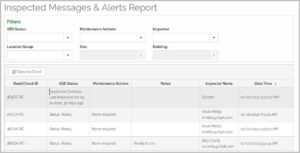
On the Inspected Messages & Alerts Report screen, you can view and export an inspection history for your entire AED fleet. To view and export the inspection history for a single AED, view the AED’s details on the Inspected AEDs page.