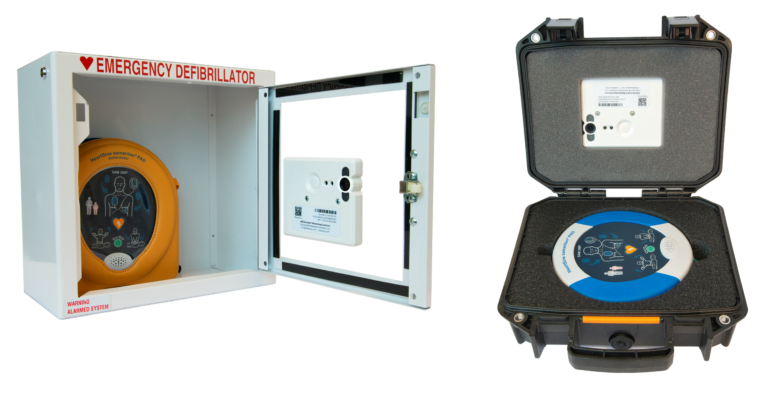
Thank you for choosing AED Sentinel. This guide walks you through the easy process of installing AED Sentinel (second generation hardware) in a wall mounted AED cabinet. A typical installation takes about 10 minutes. Once installed, AED Sentinel helps ensure your AEDs are always ready when you need them.
For help getting started, click the link to view the X-minute AED Sentinel Installation Video.
WHAT'S IN THE AED SENTINEL BOX
Here's what is in the AED Sentinel box:
AED Sentinel smart monitoring camera ("AED Monitoring Camera") with attached Velcro Coin
Quick Start Guide
AED Sentinel Aiming Template
AED Placement Sticker
INSTALLATION OVERVIEW
Here are the AED Sentinel installation steps described below:
Prepare for installation
Set up the AED Readiness Manager software
Install the AED Monitoring Camera
Activate the AED Monitoring Camera
Check and finish the installation
HOW TO INSTALL AED SENTINEL
A. Gather AED Information
Remove the AED from the cabinet.
Find and write down the AED make and model, AED serial number, battery expiration date(s), pads expiration date(s) and specific AED placement location for the AED you are monitoring (see the AED Reference Guide for specifics on where to find this information on your make/model AED). You'll need this information during the set-up process.
B. Set up the AED Readiness Manager Software
Log into AED Readiness Manager
Log into AED Readiness Manager (manager.readisys.com) using the user account credentials you received from your AED program administrator, distributor or Readiness Systems. Use the Forgot Password link to set or reset your password if needed. If you still can't log in, contact Readiness Systems support for help.
About AED Locations
Understanding Locations terminology: Each monitored AED registered to your account is associated with a specific Location Group, Site and Building. These need to be set up before you install and activate your AED Monitoring Camera. Location Groups, Sites and Buildings can be customized to match your needs. Generally, here is what the terms mean:
Location Group: A general grouping of sites. Location groups can be defined as needed. For example, geographic region, state, city, school district, business or educational campus, division, business unit, and so on.
Site: A location with one or more buildings where you have monitored AEDs.
Building: A building where you have monitored AEDs.
Confirm Your Install Location is Set Up
From the Dashboard page, click the Locations tab.
Confirm the Location (Location Group, Site and Building) where you are installing the AED Sentinel monitoring unit is listed.
Set Up New Install Location if Needed
If your Location is not listed, add your new Location using the Add Location, Add Site and/or Add Building buttons.
Set Up a New Monitored AED
Click the Monitored AEDs tab.
From the Monitored AED page, click the Add Monitored AED button.
On the Add Monitored AED page, complete the form:
Enter the Sentinel ID associated with the AED Monitoring Camera you are adding. This number is found on the side of the AED Sentinel box and the front of the AED Monitoring Camera.
Select the Location Group, Site and Building where the AED is located.
In the Placement field, enter a description of the specific place in the building the AED is located. For example, “First Floor Break Room.”
In the AED Information section, select the AED Model from the dropdown list. Note some models have two entries, one in a carrying case and one with no carrying case. Be sure to select the correct entry.
Enter the AED serial number, add the primary battery expiration date and the primary pads expiration date you gathered when completing the preparation steps above. If needed, tick the checkboxes to track one spare battery and up to two spare pads. Be sure to tick the Pediatric box for pediatric pads.
Then click Save and return to the Monitored AEDs page. You are now ready to attach and activate the AED Sentinel smart monitoring camera.
C. Attach the AED Sentinel AED Monitoring Camera
Get to Know the AED Monitoring Camera
AED Sentinel is a patented, easy to use 24/7 remote monitoring system that uses internet-connected technology to automatically monitor your entire fleet of AEDs and notify you whenever they require maintenance.
The AED Monitoring Camera performs daily AED readiness checks by taking a picture of your AED's status indicator. AED Sentinel data is transmitted to the cloud via the cellular network. No Wi-Fi connection is needed.
Attach the AED Monitoring Camera to the Cabinet Door
These instructions describe how to attach the AED Monitoring Camera to the inside of a standard AED cabinet door. Please contact Readiness Systems support if you need help installing AED Sentinel in a different environment. [GRAPHICS TO BE ADDED TO THE FOLLOWING INSTRUCTIONS]
With the AED outside the cabinet, peel and stick the AED Placement Sticker to the back wall of the cabinet, behind where the AED will be placed.
Place the AED inside the cabinet, all the way to the back and all the way to the left with nothing underneath it, behind it, or obscuring its status indicator.
Close the cabinet door.
Remove the backing from the removable vinyl AED Sentinel Aiming Template.
Stand in front of the AED cabinet, your eyes level with the AED’s status indicator.
Apply the aiming template to the OUTSIDE of the AED cabinet window, printed side out, straight up and down, and positioned so the AED’s status indicator is exactly centered as you look through the aiming template’s View Finder.
Open the AED cabinet door.
Remove the protective backing from the Velcro Coin on the Velcro side of the AED Monitoring Camera. Firmly attach the camera to the INSIDE of the AED cabinet window, exactlycentered within the aiming template’s black border.
Close the cabinet door and confirm the AED Monitoring Camera’s aiming reticle is centered within the aiming template’s View Finder. If needed, separate the two sides of the Velcro Coin and then reattach them to center the aiming reticle in the View Finder. It is okay if the two sides of the Velcro Coin are slightly offset to ensure proper aiming.
Remove the aiming template from the outside of the AED cabinet window and store it for later use if needed.
Place the 2" diameter round vinyl sticker to the outside of the AED window, over the Velcro coin.
You are now ready to activate the AED Monitoring Camera.
D. Activate the AED Monitoring Camera
Activate the AED Monitoring Camera and close the cabinet door: Open the cabinet door and place your finger on the activation button. While watching the LED Status Light on the Velcro side of the camera, press and hold the activation button for about 3 seconds until you see the LED Status Light start blinking green . As soon as you see the LED Status Light start blinking green, release the activation button and quickly close the cabinet door.
Monitor the activation: The LED Status Light will continue blinking green for up to 5 minutes while the AED Monitoring Camera finds and connects to the best cellular network, configures the settings for the monitored AED you set up in the AED Readiness Manager software, and captures and transmits an AED status indicator image.
The LED Status Light will show solid green for 15 seconds when the AED Monitoring Camera successfully completes the activation process, and it will then turn off.
Check the installation: Log into AED Readiness Manager and make sure the AED's status indicator image was received and is centered in the picture.
Troubleshooting: If you see the LED Status Light turn solid red or start blinking red , try activating the AED Monitoring Camera one more time. If you still encounter a solid red or blinking red LED Status Light, please call Readiness Systems at (855) 291-9100 Ext. 4 during regular business hours for real-time support while you are at the AED cabinet location.
User Action
LED Status
Instructions
Press and hold activation button for about 3 seconds
Off to solid blue
Open the cabinet door and place your finger on the activation button. While watching the AED Monitoring Camera LED Status Light on the Velcro side of the camera, press and hold the activation button until you see the LED Status Light turn solid blue (about 3 seconds).
Release the button
Slow blinking green
When you see solid blue, release the button and quickly close the cabinet door.
The LED Status Light will change from solid blue to a slow-blinking green that will continue for up to 5 minutes. During this time, the AED Monitoring Camera finds and connects to the best cellular network, configures the settings for the monitored AED you set up in the AED Readiness Manager software, and captures and transmits an AED status indicator image.
Success!
Solid green
The LED Status Light will show solid green for 15 seconds when the AED Monitoring Camera successfully completes the activation process. It then turns off. The AED Monitoring Camera is now activated.
Check the installation
Off
Log into AED Readiness Manager and make sure the AED's status indicator image was received and is centered in the picture. Also, confirm the AED Status is showing Ready.
Troubleshooting
Solid red or Fast blinking red
If you see the LED Status Light turn solid red or start fast blinking red, wait 15 seconds for the LED Status Light to turn off and then try activating the AED Monitoring Camera one more time. If you still encounter a solid red or blinking red LED Status Light, please call Readiness Systems at (855) 291-9100 Ext. 4 during regular business hours for real-time support while you are at the AED cabinet location.
E. Reactivate the AED Monitoring Camera
You may need to reactivate an AED Monitoring Camera for the following reasons:
You need to capture a new image after re-aiming the AED Monitoring Camera
You change the make/model of AED in an AED Readiness Manager Monitored AED record
To reactivate your AED Monitoring Camera, follow the steps outlined in Section D, Activate the AED Monitoring Camera, above.
F. Powering Off the AED Monitoring Camera
You may need to power off the AED Monitoring Camera for the following reasons:
You move the AED to a new location where you want the AED Monitoring Camera to initiate a new cellular network connection scan
You want to temporarily decommission the AED Monitoring Camera
Here is how to power off your AED Monitoring Camera:
Power off the AED Monitoring Camera: Open the cabinet door and place your finger on the activation button. While watching the LED Status Light on the Velcro side of the AED Monitoring Camera, press and hold the activation button for about 8+ seconds until you see the LED Status Light start blinking green/red fast. Then release the activation button. The LED Status Light will turn off after 3 seconds signaling the AED Monitoring Camera is powered off.
Activate the AED Monitoring Camera: After the AED Monitoring Camera is powered off, follow the steps above in Section D, Activate the AED Monitoring Camera, to activate it again.
Sign up to receive AED law updates and AED program compliance news, views and analysis.